A Mixer MIDI Control Hardware Hack!
|
A Mixer MIDI Control Hardware Hack! |
||
|
|
by Sandy Sims
| I
decided to take a break from a major project I've been working on (not music
related) to build yet another project! This is something I have wanted for a long time, and because it'd only take a couple days to build, I thought it'd be nice to have.
I presently have a Phonic Helix
Board 18 channel Firewire mixer, and I love the thing...except the
Firewire...but one thing that I'd really like is to be able to MIDI control
some of the level controls.
|
|||||
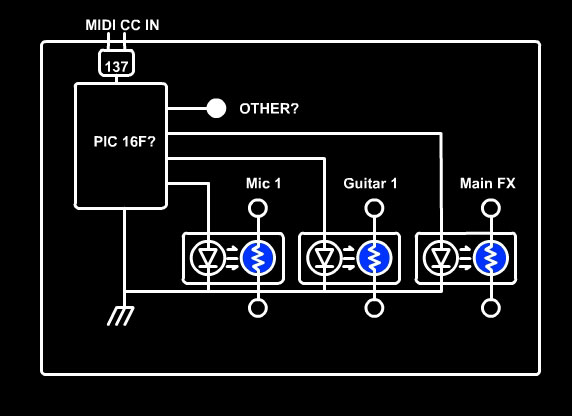
| Here's an example
of the problems I've had:
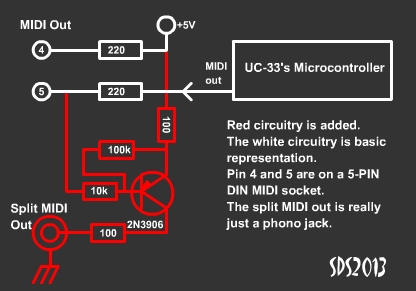
The Mic input is feeding into a vocoder that becomes active during some parts of a song. When the vocoder kicks in, the original Mic audio is still being fed into the mixer's bus, which sometimes overpowers the vocoder and ruins the intended effect. So as a stop-gap solution, I reduce the level some on that mixer channel for that song. Then I forget to turn it back up for the next song after my hands are full with the keyboard or a guitar! Here's another problem I've had: I want a vocal "chop" effect in one part of a song, and the level needs to be so high coming back from the computer that a feedback starts, so all you hear is the first one or two chops, then squeal! Well I've had it with all that. My requirements are light really. All I want is a Mic level down, Guitar level down, Mixer FX level up, and secondary mixer output level up/down. I had less requirements a couple days ago, as can be seen in the diagram to the right! A small PIC16F57 should be able to do the job. The ideal thing to pull up/down slide or rotary pots is to use a CDS cell, or photo-resistor. This allows isolation, polarity doesn't matter, and they're a bit slow so no "clicks". Dimming an LED on it will change the resistance across the mixer control. I have used this method on other audio circuitry, and it's works great for a "quick 'n dirty, if you're not too picky about linearity and gain curves. Normally it'd be in a Wheatstone bridge, but I don't want to modify the expensive mixer too much! As long as it can pull down (or up) levels in rough proportion to an automated knob in FL Studio, it's good enough.
|
 |
||||
|
|||||
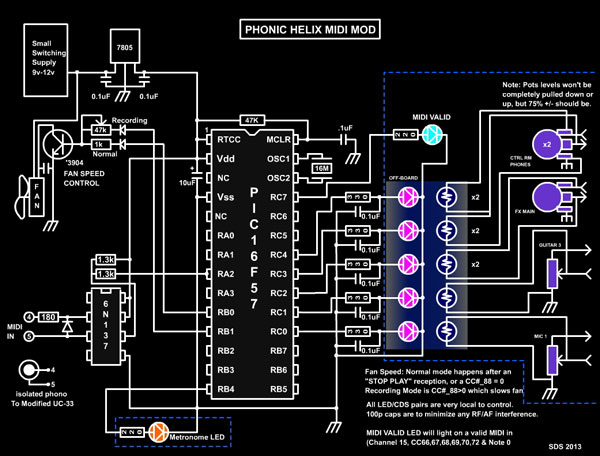
| The
schematic shows how simple the little thing is. I was going to photo-etch
the board, but hand -drew it instead. A laundry pen works well in Sodium
Persulphate.
Now there's 2 new additions to the board as well. A fan speed control so it
can be slowed to a crawl during recording in the studio, reducing mic noise. An opto-isolator, 6N137, is where the MIDI signal is fed in, and that is picked up by Port A,2 on the PIC. The Main routine manages the PWM signals to the LEDs. The resolution of the PWM is only 64, but is plenty. It's amazing how fast the 16 MHz crystal gets chewed up by PWM. First it's /4 for the PIC, then /48 by the main routine, then the PWM period is /64! So all that's left for PWM speed is about 1.3 kHz. The caps on the outputs smooth that off. I forgot to mention I put diodes off of each port RC,0-RC,4. So I didn't need to use big caps! I wrote a rather complex MIDI RX routine because this PIC doesn't have a USART ( a challenge. again! ) but it seems to be stable. The CTRL RM and FX pots on the mixer are stereo, so 2 CDS's will be needed on the FX pull-down, and 4 CDS's on the CTRL RM because I want to pull it up or down. This means I can't finish installing the unit inside the mixer until I can get more of those dollar store night-lights which have CDS cells in them :| I'll post a couple of photos once that's done. This will be so sweet! I can't wait! BTW: the .asm / schematic/user guide/ etc files are in a .zip below, Cheers! |
 |
||||
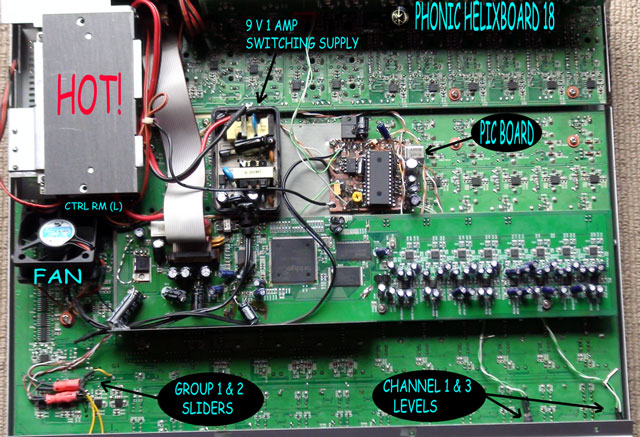
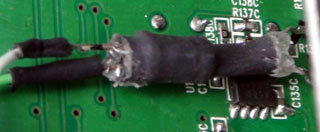
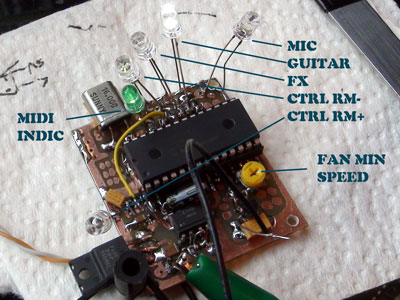
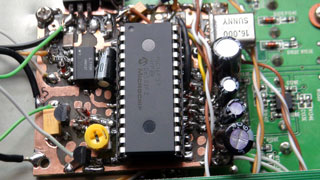
| Update
March 19 2013: Well I managed to get the board, power supply, and the fan installed, and I must say things are working better! With that fan off the mixers mains, there's only a light hiss in "dead recordings" and with a proper voltage driving it, the whole thing stays much cooler. As can be seen in the picture above, which I've marked out mostly for my benefit, a nice place was found for the board. It's very important to keep it away from any really sensitive circuitry, like the mic inputs, or a hum/tone may occur. Happily, there is a nice metal ground plane meant to protect some of the FX circuitry, or the other circuitry from the FX module. |
|||
|
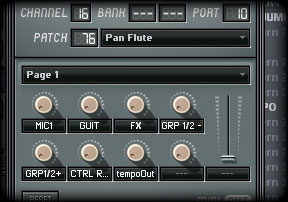
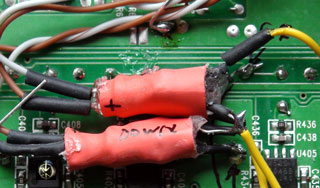
The
LED/CDS isolators shown are Channel1, Channel 3, and Group 1/2. Yes,
I changed the pull down/up stereo isolators over from CTRL RM to Group
1/2. This is because this can give me another layer of sound control of
only the live elements...i.e. stuff that's coming into the mixer, not the
PC interface. This will be more for effects in a build I think. The LED/CDS isolators not visible are the stereo FX pull-up, and the 1-side CTRL RM pull-down. Apart from the headphones amp, I only use the one output because the big Subs are just one channel. I chose left.
The MIDI plug is not a MIDI plug, just a phono jack. I used the SPDIF socket for it as I never use SPDIF - ever. On the UC-33 MIDI repeater, I also used a phone jack, so there! A matched set!
The fan speed is
on a note on the same MIDI channel. I don't know how often I'll use that
as the mic barely picks it up. |
|
||
| I'm so happy I could share this project with you all, and I hope you've picked up some good ideas from it. I sure did! | |||
- Mixer/MIDI PIC Files (zip) - Digikey
![]()
...to Studio projects page
Webmaster Sandrine Sims, Video Gena Hollingshead
Thanks to Jamie Nuotio & Peter Locke for all the wonderful new inspirations
(C) FRESH NELLY MUSIK 2013