I
want to record with multiple scenarios, and multiple recordings, all during
a performance. In it's simplest form, have the footswitch record as long as
held down, then playback in sync as a loop once the footswitch is released.
This sounds pretty straight forward, but believe me it's not! ...well unless
you don't care about sync/alignment and tempo...
The key is to keep it simple to use, but have several types of
functionality. Here's what I've thought up:
Record/Playback Modes:
1) Single Record/Playbacks using footswitch sequences, 1 tap/hold rec,
release/tap play
2) Single/Multiple Record/Playbacks as above but start/stop aligned to
next beats or bars
3) Midi Song/Loop triggered Record and play, automatic. i.e. a certain
loop records, another plays
4) Pitch Shift audio samples to match a key change, mostly FX & backing
voice
Update:
Catastrophic Failure!
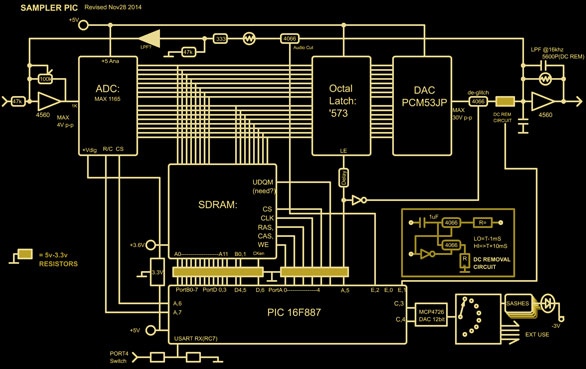
Changing the Recorder Function to Sample Player, and designing a new
Sampler.
See Below.
The Chip:
I've used ISD recorder chips for over a decade now for SFX,
microcontroller projects prompts, even the stereo system I built for our
boat, but they were pretty straight forward and didn't have an official uP
bus of any kind. The audio quality was OK for a 2" speaker in a box, or
robot voices, but for any kind of music, even drums, it sucked terribly. The
quality reminds me of those old Bucket-Brigade echo/reverb chips. Poor
sample rates around 6K/S make aliasing a nightmare for anything other than
voice.
I was trying
to figure out how much overhead it would be to record digital audio with CD
quality. It's a big task to accomplish! There's some amazing boards, like
the one I am using for this projects on-board MIDI Synth, the
VS-1053.
This chip can encode to MP3/PCM/Ogg and stream via a high-speed serial bus
for record and playback. But for sample rates beyond 8k/s, one would need to
have an ARM Cortex level processor. Hell, might as will put in a PC-duino!
Anyway, these limitations left me a bit discouraged, and I sauntered over
to the now Novoton's site to see if they had developed any chips with better
sound quality. Lo-and-behold the ISD15100!
This chip is a huge jump above the rest of their line. It can record in
ADPCM/uLaw and PCM up to 12 bits@32k/s! Totally awsome I thought.
ISD15100 Issues:
The actual design level datasheet was extremely hard to get a hold of, the
demo-board data sheets, which are an abridged version to use with their
developers software were easy to find, but useless. It appears this chip has
been designed for automated telephone answering systems, and the dev.
software reflects that. Another downer on this chip, as with so many others,
it's a LQFP case with .5 mm pin spacing, not exactly human friendly. Digikey
has their smaller demo board/breakout but it's $32 CAD and only has the 2
minute chip on it. ( They go up to 16 minutes @ 8khz/4bit ADPCM ) I want the
4 minute which is about $12 CAD, so guess I'll be soldering this puppy.
BTW I'm getting a proper reflow solder station with pre-heat, so hopefully
that'll do the job!
|
|
|
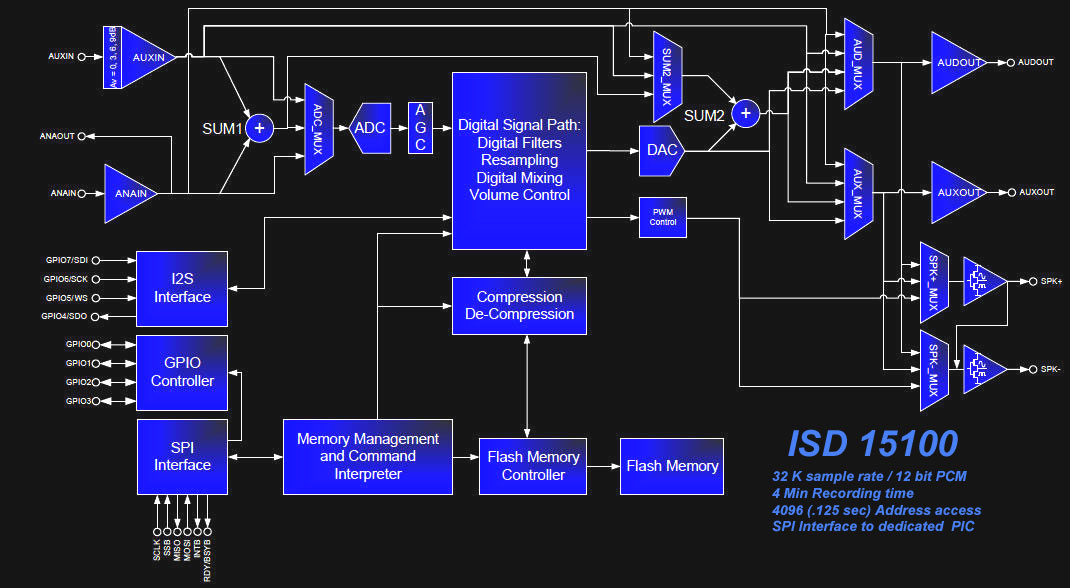
The datasheet
was also pretty hard to follow, a sort of labyrinth of options & settings
for it's various modes and many audio configurations. As you can see by the
top of the page diagram, it can do lots! Imagine my surprise when I started
programming for configuring the registers and discovered there's 48 of them!
..Well 32 actually, as the last 16 are for "voice macros". Still 32 is a big
number. Oh well. I do like the options of how audio can be fed though /
mixed to record, mixed to playback etc. It has taken some circuitry off of
my board for sure. ISD15100's
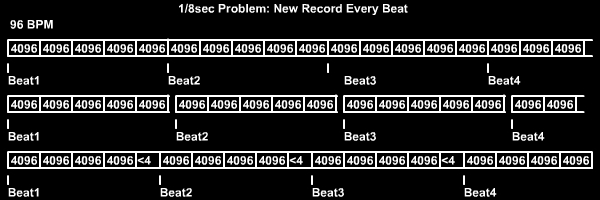
Sample addressing:
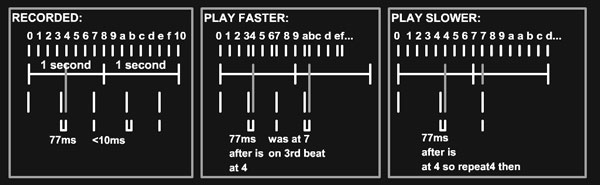
Another issue with this chip in my design is the addressing. It is divided
into 4096 byte chunks. While this simplifies design and interfacing, it
makes addressing a 125 mS step. Now normally, this isn't a problem, but
after a stop record, the record doesn't actually stop until the present 4096
chunk's end. This makes back to back looping impossible, unless all the
tempos were in multiples of .125 seconds. The bizarre thing is, the "chunk"
address is 3 bytes long. It only needs to be 2...I think
The other problem "chunk addressing" presents is playback in a different
(maybe even slightly different) tempo. If the tempo has changed since the
record happened, then "fine" adjustments can't be made to a 125 mS address.
The master oscillator can be controlled by an external resistor, or source,
but if you've ever played with samples in a sequencer, it doesn't take much
of a tempo change to result in a noticeable shift in frequency of sample. |
|
I though it'd
be possible to logically "overlap" every Nth sample to make up for empty
spaces if the tempo is slowed. I duplicated this with FL Studio's beatslicer
and found that it would double the starts of guitar notes, which is really
noticeable. Mid notes were ok. It's too bad this won't work as it'd be
fairly easy to implement. 125mS doesn't sound like much, but it's huge
really. The diagram to the right shows this doomed method.
Another,
albeit elaborate, method is to slow down/speed up the master osc. to match
tempo, then use a pair of NE612's to up-mix into RF frequencies (455kc),
filter, then down mix with a fixed oscillator to recover the audio at the
original frequency. This method will use lots of hardware so it's not my
favorite!
The last
solution would be to start a new recording on every beat (diag. lower
right). If tempo speeds up or slows down, then the next playback would cut
the last short a bit, or just go quite. The going quiet part isn't a good
thing at all, but it may be covered up by the "beat" or even produce some
cool FX.
For the slower tempo (record tempo would be kept) the ISD15100 has a DC
voltage ramp-off to zero. This will stop "clicks" at the end of samples, but
if the tempo is faster, this would need to be disabled or there'd be a space
between each, and unknown delay values. The cryptic datasheet doesn't
mention what the ramp speed is, but I imagine it'd be at least 20mS.
Another method,
albeit not a solution, is to just stay in tempo. If the sample is long, then
that will be pretty intuitive in the same way keeping tempo when playing in
a band is, even without percussion. |
 |
Design
Plans: Footswitch Control
As I mentioned above, there needs to be several Record/Playback Modes. The
first, using the footswitch, is the most interesting.
1) Footswitch, No Tempo:
Recording a loop without a tempo as opposed to with a tempo will need to be
totally different as there is no loop terminator. Basically, the record
should be a Hold Footswitch function, and the playback on release. Another
mode could be tap to record, next tap ends record and starts play.
1) Footswitch, With Tempo:
Recording with a tempo would add more flexibility and number of samples.
Came up with this method of setting how the footswitch will act:
|
Action: |
Touch 1 |
Hold 1 |
Touch 2 |
Hold 2 |
Touch 3 |
Hold 3 |
Touch 4 |
Hold 4 |
Touch 5 |
Hold 5 |
Touch 6 |
Hold 6 |
Touch 7 |
Hold 7 |
Touch 8 |
Hold 8 |
|
Preset#1 |
Record#1 |
Record#2 |
Play#1 |
Play#2 |
Loop to #2 |
Loop to #1 |
|
|
|
|
|
|
|
|
|
|
|
Preset#2 |
Record#1 |
Record#1 |
Record#2 |
Play#1 |
Play#2 |
Hold at 1 |
|
|
|
|
|
|
|
|
|
|
|
Preset#3 |
Record#1 |
Record#1 |
Record#2 |
Record#2 |
Record#3 |
Record#3 |
Play#3 |
Play#3 |
Loop to #3 |
Play#2 |
Loop to #4 |
Play#1 |
|
|
|
|
|
Preset#4 |
Record#1 |
|
Play#1 |
Play#1 |
Record#2 |
|
Play#2 |
Play#2 |
Loop to #1 |
Loop to #3 |
|
|
|
|
|
|
* Notes:
The way this works is each action on the footswitch executes the action in
that step. The step is then incremented to the next (unless loop to/hold
at.) If >8 steps, it loops back to first.
The "Touch" Record triggers cause a continuous record until it reaches a
user set Bar limit, or end of memory, or footswitch is touched/held again.
The "Hold" Record/Play starts record/Play and stops recording/playing upon
release, regardless of beat/bar. Good placement of each type is important as
shown in Preset#2
There can be a Max of 4 different Records in any step sequence, they
should be in order 1,2,3,4
The user (me!) can set
each of 4 Presets to however it's easy/memorable. A couple of things
regarding the difference between "touch" and "hold":
- Touch must be short enough that it isn't considered a "hold". (User
Settable 50mS to 250mS)
- The action in the present step will begin to execute after the release
of footswitch for touch, but after max touch time out for hold.
- "Loop to" acts on release of touch, or if held, then after time-out of
touch as above. Loop Destinations "Touch" will be executed on next beat /
bar
- "Hold at" acts as above, but doesn't execute that Action, just waits
until footswitch touched/held. This allows either action to be selected,
unlike "loop to".
- To skip over a record in touch, (to get to next step) just touch and let
it record and next step will stop it.
*Possible issues with
recording this way might be:
When should the recording start? At a Bar or at the beat before a bar.
I've played around with long echo's (which is a form of recording
really) in a sequencer and noticed that starting a recording right on a Bar
isn't always good, especially with vocals. It's hard to notice unless you're
thinking about it, but most of the time, the vocals start slightly before a
bar, a sort of lead-in I suppose. I've thought about having an offset
continuous recording loop going if "record/play" is set up as soon as there
is a proper tempo, but this might wear out the flash memory pretty fast! And
the flash memory life (of course) isn't mentioned in the datasheet. I guess
it could be an option...
Another way would be to use the chips "peak detector" (set low) to detect
the start of audio on the input and mark where in the beat it was, then
duplicate that in the loop. I think I made that an optional trigger now I'm
thinking about it. Still that doesn't really help much unless it is going to
be a release to play action.
I think it basically comes down to the user, me, knowing when to kick that
Record in!
MIDI
Song/Loop Control:
This mode is totally exciting to me because I've "sorta"
used it before. Last Year a couple of my songs have what I call "word echos"
where I sing the last word of a line and FL Studio has "recorded" it into a
long delay, which then repeats on every 2nd beat etc. With running EQ FX,
this is a super cool sound. With the
Audio layout the Playback can be routed to
an EQ as well.
Anyway, being able to record selected elements of a song as they're played
into the mixer, whether it be vocals, guitar, piano, fart sounds whatever (lol)
offers an amazing "live-ness" to the song. Implementing that into this
circuit is just a matter of using the pre-ordained MIDI Channel 16's special
notes to easily turn on/off record segments, then play them back in the song
as a loop or just a one-shot. Because there is to be a MIDI input on the
Show-In-A-Box, this can be sequenced live from the computer in a Song
Sequence, before creating a MIDI file (time saver!)
In Loops, it'd be a function of 1 or 2 loop files and to be honest, I'm
not really sure how that'd play out (sorry 'bout the pun!) It'd
be done the same way as in a Song though, which could yield some interesting
results.
Recording overdub mixes:
Because the Recorders Playback can be fed into the STR2 mixer channels, a
re-record is possible. Likely there will be some degradation, but it's
perfect for layering into a new playback with an extra part in it. If
controlled with just the foot pedal, this could become repetitive sounding
pretty quick, but with MIDI controlling the instance of playback as well as
the EQ of it, it'll sound pretty natural I'd imagine.
Conclusion Thus Far:
In any case, I
l-o-v-e automation on stage, it's totally liberating to not have to push
buttons and switches and just concentrate on singing and playing/tapping. A
good example would be the following: A 12 bar blues song in footswitch
w/tempo mode:
Tap up to bar 1 (Tap Pedal not footswitch!) and initiate a MIDI Play of a
12 bar percussion loop. While performing the first verse, 12 bars, hold
footswitch to record the basic guitar strumming. At the end of the 12 bars,
release the footswitch which will trigger playback on the first beat of the
next 12 bars. Now, while still playing guitar you can run off into
embellishments up the neck! Once that's done, a tap on the footswitch would
stop playback and hold at the playback start position, where a quieter
section of the song may be, then touch the footswitch to put the origianl
guitar back in.
If you are reading
this and thinking about building something like this, go for it! But really
make sure that there is some sort of sequencing going on, even if it's just
reading a MIDI Clock coming from a sequencer. From my experimenting I can
already see that using record that's in sync is much better than not, us
humans just aren't that precise!
I hope you have enjoyed this "organized description" of the Recorder part
of the project. I will be adding updates once I get the chip mounted to a
break-out.
May 5th 2014: |
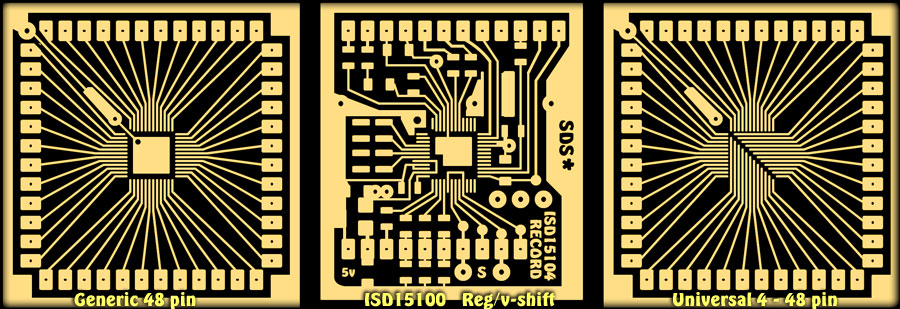
Breakout Board Fun! |
| Ahhh
the joy and fun of going one step beyond one's abilities! I've been
monkeying around in Flash again, this time to work with a challenging
scale. I downloaded the free version of "Eagle", a PC board designing
software, but I have only tried a couple of examples, so I reverted to
the tried and true Flash method.
I designed the
3 boards because I hate wasting transparency paper (for photo-etching),
and also because I may need them in the future for other .5 mm chips.
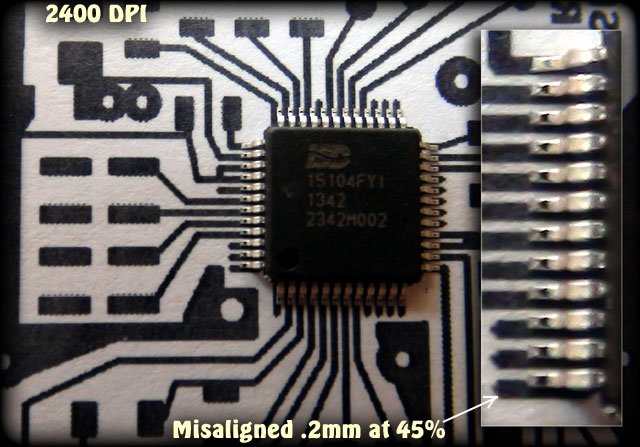
The nice close-up to the right was done holding my Sony Cam, I'm going
to make a stand for it so it can be a microscope! I tried an alignment
to check the print size on paper at 45%. You can see it's off by a bit
so I'll try reducing to 44%. I'm sure the DIP header spacing won't
change enough to be an issue.
I ran
the Brother laser printer up to 2400 DPI, set "Finer Lines" option, and
set the contrast to max, but still there's that annoying dither...the
little dots on some of the pads. Luckily, they don't seem to be
happening on the chip's pads. Straight lines I guess.
The layout must always be "flipped" to the ink side is touching the
board during exposure. If it's not done this way with traces this fine,
sometimes light will leak underneath, ruining the traces.
Soldering
this will be another learning experience, I may do a test run with an
old chip on another board first. It's not that I've never hand soldered
.5mm chips before, I did a DDS9850 but it didn't have near as many pins.
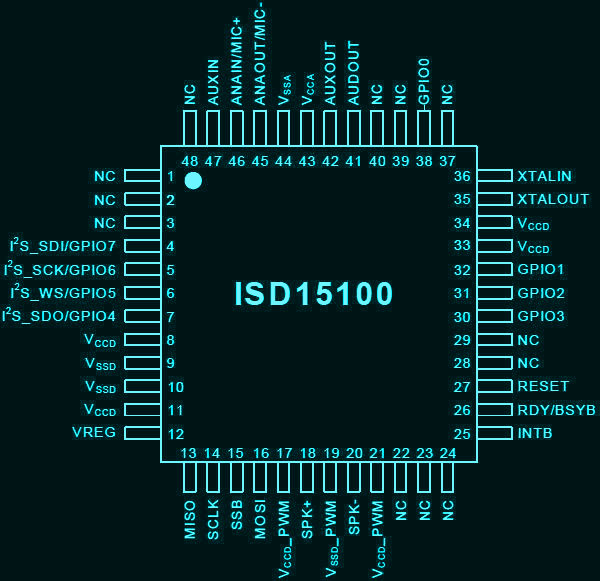
You may have noticed the ISD only uses half the pins. Why couldn't they
make them every second pin? It'd be easier to deal with for sure!
I'm
coming down with a cold, so it's tonight or never! I have to wait until
it's dark as we don't have a dark area in the house anywhere, believe it
or not.
I've ordered a reflow solder station, but I don't know if I can wait
until it arrives. Getting underway on programming for this chip seems to
be a priority. |
 |
|
In order to
test and develop a method of syncing this chip, I need to have it
working. The actual chip, if you can't it in the photo, is an ISD15104.
This is the 4 minute version, which was only $1 more than the 2 minute
version ($13) on the pre-made demo board. ($32 CAD) I probably won't
need 4 minutes, but I'm kinda tossing around using part of this chip's
memory for the distortion PIC part of the project.( I2S interface )
Well that's it
for now!
|
|